Getting Started
Introduction
Welcome to MyAppuccino WP docs, here we will cover the steps to getting your WordPress site setup and pulling content into your app.
Considerations
Before we get started we must have a WordPress site setup with the MyAppuccino for WordPress plugin installed, there are two ways that you can setup your App environment, one way is to simply install the plugin alongside your current WordPress site so that you can easily share pages/posts and content between your site and app.
Alternatively you can have a separate site just for your app which can be securely isolated away from the public.
Requirements
Before we get going ensure that you have the following:
- A MyAppuccino.com account
- A Wordpress site with MyAppuccino for WordPress plugin installed
- MyEspresso app downloaded to your device for previewing your app
- An Apple Developer Account (required to publish your iOS app)
- A Google Play Developer Account (required to publish your Android app)
Plugin Structure
wp-content/plugins/appuccino
└───view/
│   └─── partials/
│   └─── templates/
│   └─── source/
│   └─── resources/
│        └─── css/
│        └─── js/
We do not use your site’s template within your app as this pulls resources we may not need which can ultimately slow down your app; we also aren’t making a responsive version of the site - this is an app!
Your templates are stored within the plugin’s view folder which is broken up into four main subfolders:
| Folder | Description |
|---|---|
| partials | Reusable pieces of code such as a header, footer and sidebar. |
| resources | CSS and JS files used within your app. |
| source | Uncompiled CSS and JS, this is then compiled into the resources folder. |
| templates | Views layouts which are available to choose from within the App Pages tab. |
This structure is mimicked within the app and resources can be called in this similar way.
Partials
When you create a view within your app it may be useful to have a header and footer, instead of adding one to each of your templates we can create once and pull them into as many templates are desired.
<div ng-include="base('partials/header.html')"></div>
ng-include=”app.app.base_url + ‘partials/footer.html’”has been replaced bybase()
Lets say that we have a new template wish to pull through the header partials which is saved under the partials folder as header.html we simply add the following line to our template to bring it into the view.
Resources
This folder contains subfolders for styling and javascript files, here we can add custom plugins and styling to be used within the app. We recommend that you use Gulp to compile your resources as we have included tasks to compile both SCSS and JS files.
If you require external resources such as files from a CDN you can simply include them using the appuccino_enqueue filter within a standard functions.php file.
function add_external_js_myappuccino($resources) {
    $resources[] = 'https://cdn.example.com/3.0.1/jquery-ui.min.js';
    return $resources;
}

function add_external_css_myappuccino($resources) {
    $resources[] = 'https://cdn.example.com/3.0.1/jquery-ui.min.css';
    return $resources;
}

add_filter('appuccino_enqueue_js', 'add_external_js_myappuccino', 10);
add_filter('appuccino_enqueue_css', 'add_external_css_myappuccino', 10);
Source
Change directory to the
sourcefolder in terminal/command prompt
cd /path/to/appuccino/view/source
If you haven’t yet run Gulp, you will need to install NPM and Node.js and run the following command.
npm install
Once all of the packages have been installed, you can go ahead and run Gulp which will continue to run in the background until you exit the process.
gulp
The source folder compiles and minifies all of your styling and scripts into a single smaller file to ensure your app is loading smaller resources. You can get started using Gulp by following these steps:
You can manage the folder that Gulp listens to and other variables within the config.js file found at the root of the source folder, make sure that you restart gulp once changed. Once compiled you will find a single file in the CSS folder named stylesheet.min.css and a single JS file named script.min.js which contain all of your uncompiled code.
partials which contain reusable pieces of code such as a header, footer and sidebar. The resources folder contains folders for CSS and JS files, sources which contain uncompiled CSS and JS and the templates folder contains layouts that are available within the App Pages tab in the WordPress dashboard, these layouts can vary how your views are displayed within the app.
Templates
All views within the app reply on templates, these can contain login forms, lists and much more. Views contain HTML as well as Angular JS logic.
Framework
MyAppuccino makes use of UIKit for front end styling within the app, you can quickly and easily implement components using this framework as well as extend current ones available. Angular JS is also used for logic, this can be extended as required within your app.
Create your First Template
Now that you’re setup we can begin creating content to load into our app. For this section you will need to have the plugins/appuccino/view folder open from your Wordpress site so that we can being building a template.
Create an App Page
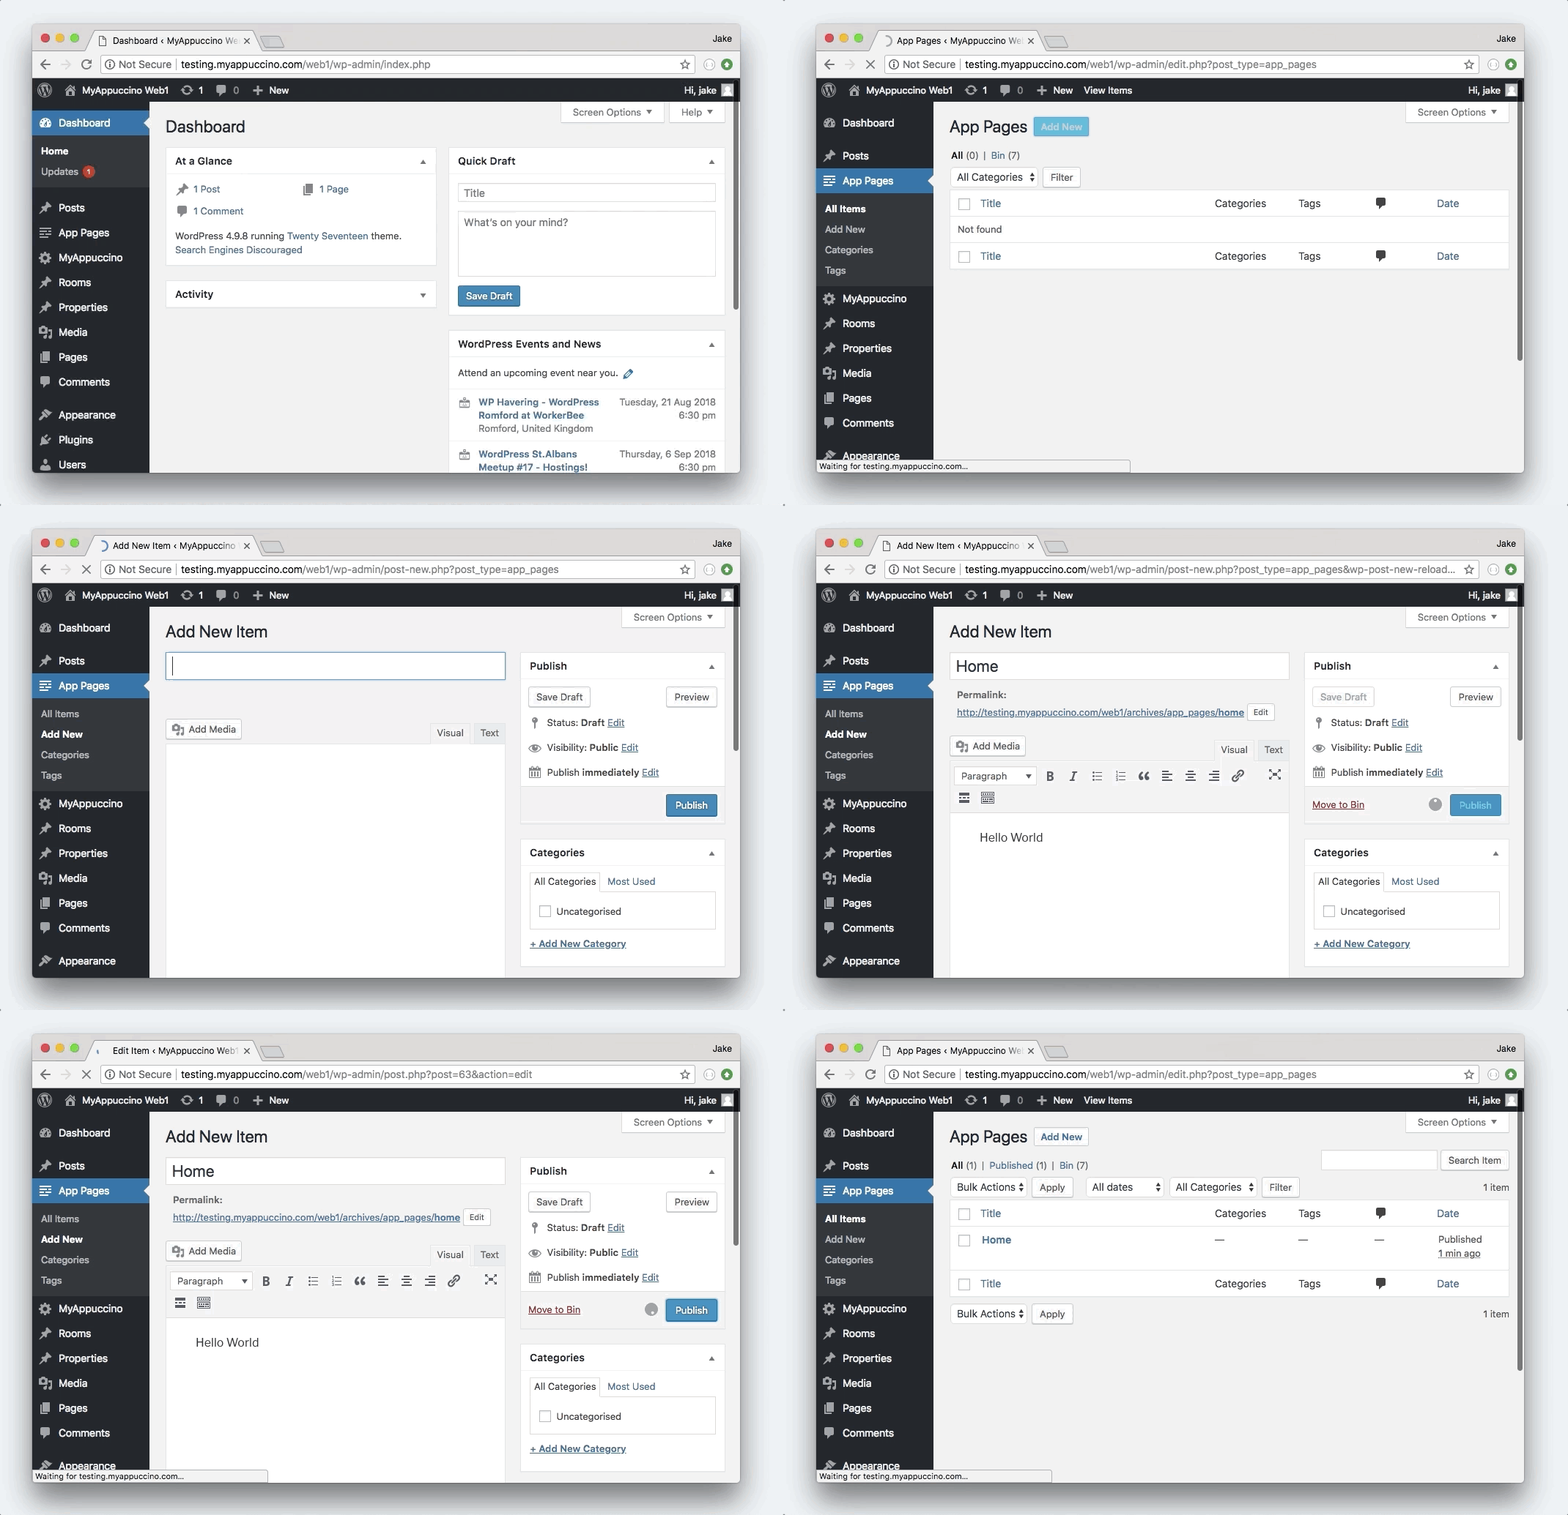
In order for your app to successfully load we need to create an app page which will be our front page “view”. For this example we have created a page in App Pages naming it “Home” with the content body set as “Hello World”.

Create Template File
Now that we have our first App Page setup we can begin creating a template, to do this we need to create a new file in templates which we will name home.php.
<div>
    <h1 ng-bind="post.post_title"></h1>
    <p ng-bind="post.post_content"></p>
</div>
We can now start pulling this information into our template, here is an example of a template to pull through the title and body content.
All template files can access the post object within the app’s controller, this is how the object looks by default for our new “Home” post.
Set Page Template
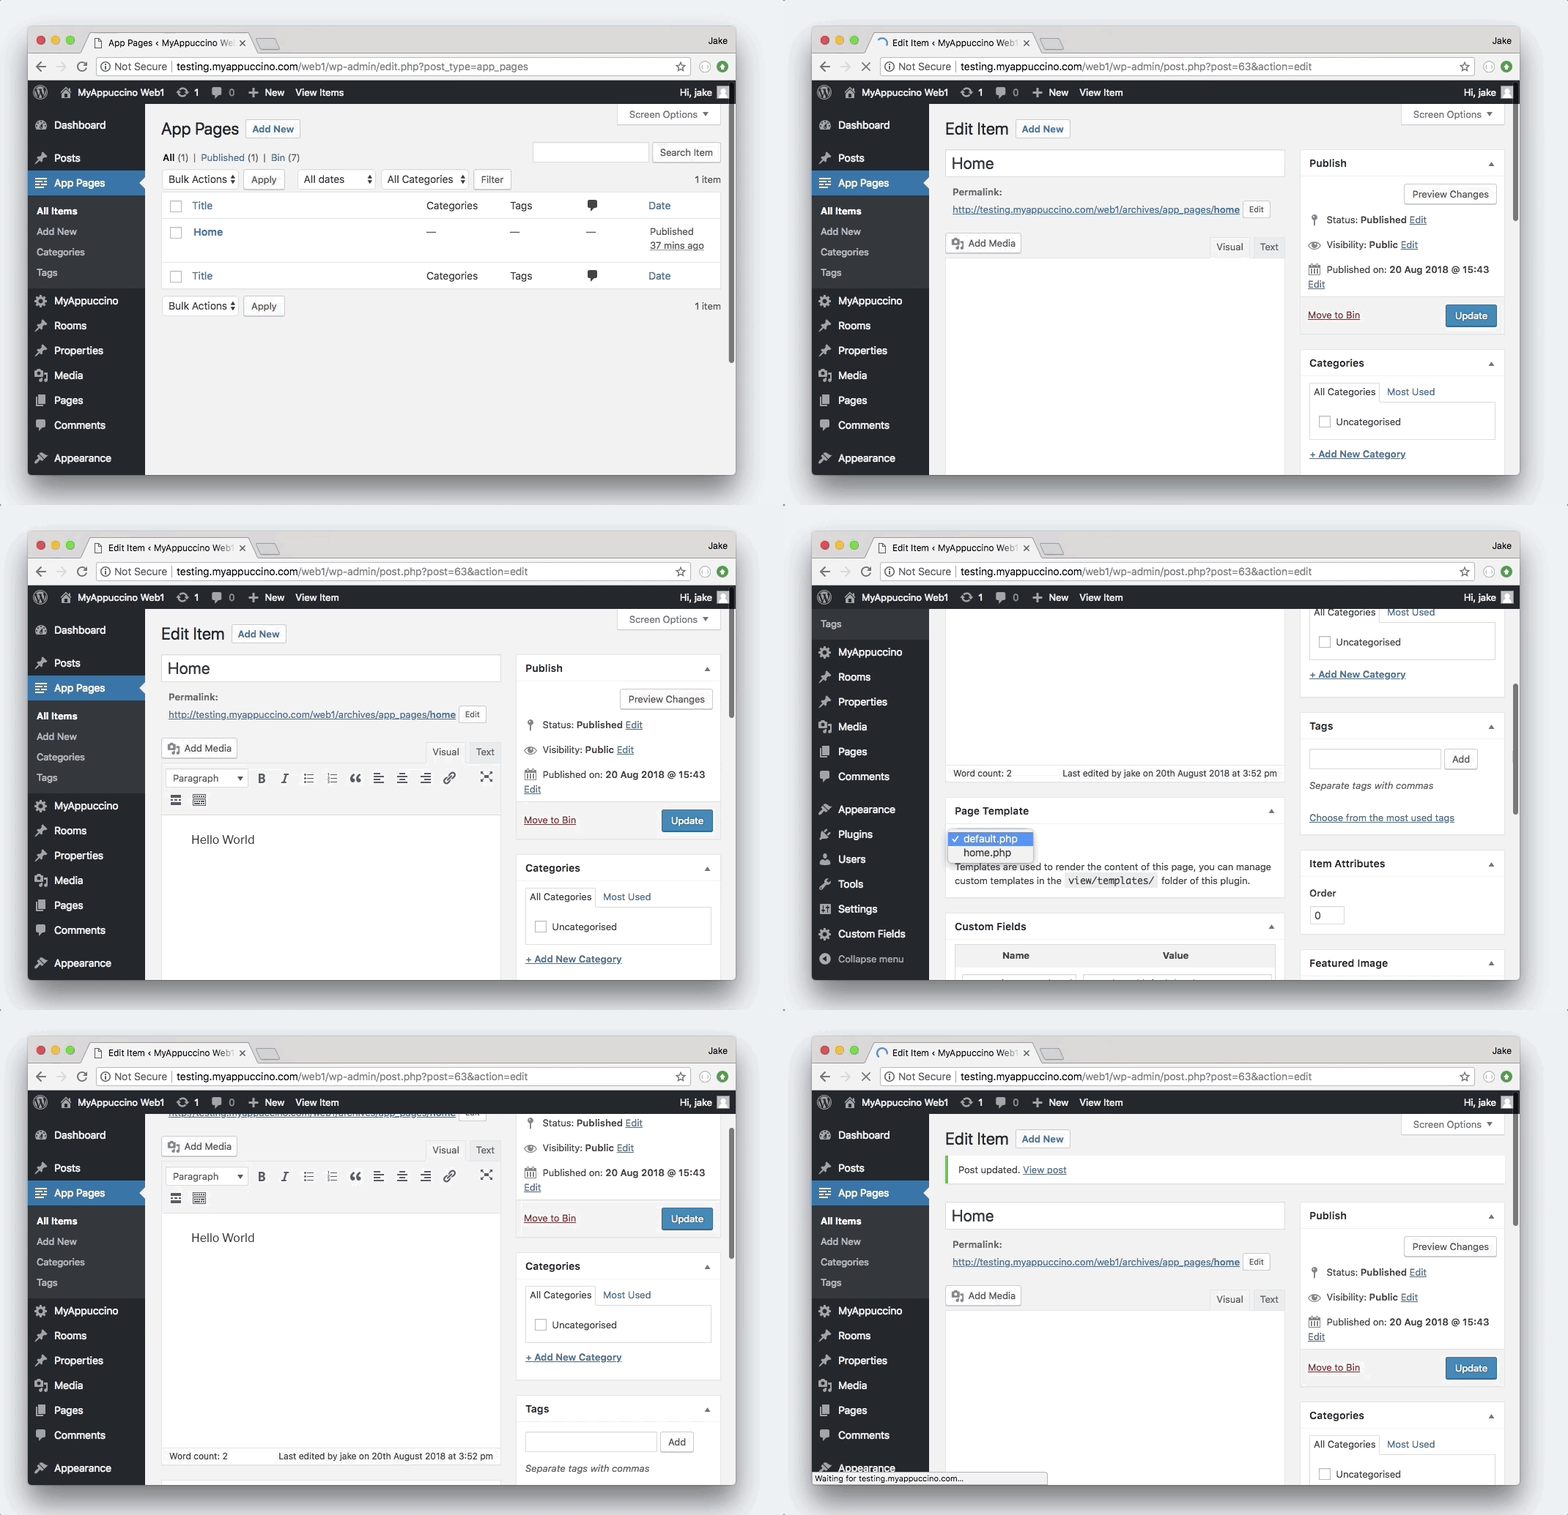
Now that we have created a template we can set our home.php template in the App Page and then preview it in the MyEspresso app.

When we come to previewing the app in MyEspresso we can see that the page header and content has been pulled through. Next we need to add navigation which will include a header.
Creating a Partial
Now that we have a template set up and content pulling through from our post object we can start adding partials to flesh out the app. We will now create a new partial called header.php which will contain the apps header. A partial can access the post object and controller scope also.
We now create the header.php and save it into partials folder, this file simply shows a header nav with a single title that reads “My App”.
<header>
    <nav class="uk-navbar-container" uk-navbar>
        <div class="uk-navbar-left">

            <ul class="uk-navbar-nav">
                <li><a href="#">My App</a></li>
            </ul>
        </div>
    </nav>
</header>
Using a Partial
We can now include the partial into our home.php file so that it looks like the following:
<div ng-include="base('partials/header.html')"></div>
<div>
    <h1 ng-bind="post.post_title"></h1>
    <p ng-bind="post.post_content"></p>
</div>
Now we have added the partial to the page we can now preview it in the MyEspresso app.
The Content
Binding
Binding Text
When a view is loaded it pulls through the post object which is automatically added to the scope of the view’s controller. A simple example of rendering text is to bind the post title to a paragraph tag.
<p ng-bind="post.post_title"></p>
Binding HTML
At some point your post content will contain HTML, if rendering using ng-bind will automatically output it as text, in this instance you will need to use ng-bind-html like so:
<p ng-bind-html="post.post_title | trust"></p>
The Post Object
The post object is the post content pulled from the App Pages within your WordPress site, essentially its a WordPress post. Each App Page that you create is a post that contains a title, content and a route that you can access as an object from within your custom JS as well as your templates and partials.
Modify Post Object
You can include any kind of information in the post object and you can modify it before it is sent to the API using simple WordPress filters available through the MyAppuccino for WordPress plugin. A simple example of modifying the post object would be to append all post content to include an elipsis by adding a filter to a standard functions.php file.
function add_elipsis_to_post($response) {
    foreach($response['posts'] as $index => $post) {
        $response['posts'][$index]->post_content += '...';
    }

    return $response;
}

add_filter('appuccino_get_pages_response', 'add_elipsis_to_post', 10);
Image Encoding
In order to ensure that your app performs offline without issues, the MyAppuccino for WordPress plugin automatically encodes img images to base64 so that when a users device is not connected to the internet the image data is already saved onto the machine and does not try to load images from a URL causing broken images. You can modify the maximum filesize for encoding in the config.php file within the MyAppuccino for WordPress plugin.
Custom Attributes
You can add custom attributes to the post object which are added to a settings property. In order to add a custom attribute you must set the data type followed by a colon ([type]:[key]) and add it to the Custom Fields section of the post. Here is a list of available types.
{
    "posts": [{
        ...
        "settings": {
            "demo_int": 1,
            "demo_string": "World",
            "demo_float": 1.5,
            "demo_bool": 1
        }
    }]
}
| Type | Returns | Example Key | Example Value |
|---|---|---|---|
| int | Integer | int:demo_int | 1 |
| string | String | string:demo_string | World |
| float | Float | float:demo_float | 1.5 |
| bool | Boolean | bool:demo_bool | true |
The Data Object
At some point you may wish to share data across multiple views, one way of achieving this is to append the same data to all of the post objects so that it can be used in all views but this causes an unnecessary amount of duplicate data and can slow down the app.
Add to Data Object
In this scenario we can pass information to the data object which is accessible to all views. We can add to the data object in a standard functions.php file by using the following filter:
function add_hello_to_post($response) {
    $response['data']['hello'] = 'World!';
    return $response;
}

add_filter('appuccino_get_pages_response', 'add_hello_to_post', 10);
Output Data Object
This then outputs the following payload to the app.
{
    "posts": [{
        ...
    }],
    "data": {
        "hello": "World!"
    }
}
Access Data Object
We can now access the object within our controller under any view.
$appuccino.action.add('application/controller', function() {

    var $scope = this;

    alert($scope.data.hello);

});
API Driven Content
Sometimes you may require the information in your app to be instant rather than updated on relaunch/reload, in this case we can use sockets (if supported), SSE (server sent events) and even polling based on your requirements. To do this you can simply add the request functionality to the controller. You can add custom endpoints to your WordPress site using the WP REST API.
Simply bind the variable in the template or partial
<p>The date/time is now <span ng-bind="date_time"></span></p>
Add the functionality to the controller
$appuccino.action.add('application/controller', function() {

    var $scope = this;

    $scope.date_time = '...';

    $.ajax({
      url: 'http://worldclockapi.com/api/json/gmt/now',
      type: 'GET',
      dataType: 'json',
    })
    .done(function(payload) {
        $scope.date_time = payload.currentDateTime;
        $scope.$apply();
    });


});

